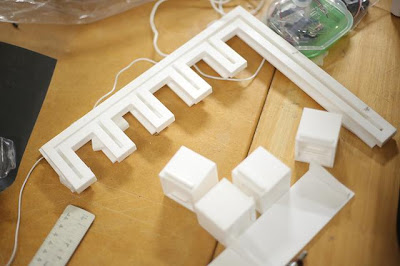
As for my assigned role for this group is together with Olivia to build up a prototype according to the design we have conducted. My main focus was to use Arduino to control a mechanic system for this automated shelf. The input of control for the motion of the servo and motor will be control by push button as a purpose to demonstrate the working mechanic, the interaction and automatic part will be demonstrate through Crysis environment.
However a few thing went wrong. The prototype and arduino did not 100% working due to the device we have chosen and the ability of it to pull of lift up an object in the prototype.
To come up with this final design, things that we considered to conclude this mechanic design was mainly the availability of the equipment we used, and the cost of the equipment. To make our prototype working perfectly our thought was to use a linear motor which can control the exactly position of the moving plate.
Video below to show example of a linear motor.
Animation created by olivia
Due the the cost the size of this device we then thought of using something that is simple and low cost but then following up with the problem that it would not able to handle a curtain weight. Which was the problem in our design and we did not realise that in an earlier stage.
As the prototype is not the main element of the project. The aim for this prototype is to establish a brief understanding of our basic concept and basic ideas toward the design of mechanic system.
Summary of the mechanic system
So this is the mechanic system that is installed on the top place of the prototype. It consists of 2 DC motors, full rotation servo, electromagnet and the battery
The 2 wires from electromagnet is twined on the full rotation servo, those wires needed to connect to the battery to enable the electromagnet. The wires must pair up with the right core to enable to electromagnet. (positive with positive, negative with negative)
The servo control the length of the wire connected to the electromagnet. (servo is controlled to rotate in two direction)
The two motor is used to pull the car left and write, the direction is controlled by L293D IC motor driver.
The electromagnet is made out of the piece of metal, wired around by very thing insulated copper wire. This needed to wire a number of time to strengthen the electromagnet to attract a steel better. (steel which is attached to the boxes) The copper wire then need to be connect to an insulated flexible wire to be able to twin into the servo.
Mechanic design with arduino
Taking the prototype into parts, the main mechanic that was included in this prototype is as followed;
1. The motor pulling the car (which has a full rotation servo and the electromagnet attach on top) left and right along the top rail of the prototype.
In terms of coding and making to to move left and right, I am able to assign code and control arduino to control the two DC motors to move left and right. The car was moving left and right according to the button pushes shown in below video.
To allow to arduino to control direction of the two motors and L293D IC was a best option available to me. As first, L293D does not cost mush it was only $3-5 a piece. With the option that I could have gone through is to use motor driver shield but that would cost us more to purchase. I did a research on how the L293D would work and came up with this two moving DC motors control by 2 set up of L293D to control each motor separately using 2 push buttons.
2. The full rotation servo
This is the part where it sit on the moving car. It is attached with the electromagnet and wire. to pull it up and down according to the two push button. Again I was successfully control to direction of the servo to go backward and forward. As in followed video
As consulting with Russell in the last week before a presentation he mentioned to me to use a stepper motor instead of the dc motor. I then did attempt to try get the stepper motor work.
But it did not seem to rotate in both direction. Please refer back to my previous post for the code and the circuit diagram. http://tharidarattanajaturonarch1392-2013.blogspot.com.au/2013/06/week-13-experiment-on-new-mechanic.html
As a lack of time and experience of using stepper motor I then decided not to put them into the prototype.
The boxes were able to move quite smoothly along the rail. Thing that we did not mention in our presentation was why the rail was there and how is it constructed.
As the purpose of our design, the rail was to hold the box still, as we did not want the box to be freely lift in the air which a high chance for it to swing, the rail is there to keep boxes in place .
The way the rail and the boxes constructed is guided in olivia's design and interpretation of the technical drawing as followed;


.JPG)


.JPG)
.JPG)
.JPG)
.JPG)

.JPG)


